
Webinar Best Practices From Home: A Guide to Audio, Lighting, and Staging on a Budget
Get the Exclusive Guide!
You’ve probably been in hundreds or thousands of Zoom meetings and virtual happy hours. You’re fairly comfortable on camera with clients and family members. But now… now you’ve got to present at a virtual conference, or a virtual interview for a new job, or you’re teaching in a virtual classroom.
Whatever the reason for wanting to improve your video conferencing skills, you can achieve professional quality in a short time and without putting a dent in your wallet. There is no need to buy a professional lighting kit or dedicate a week of your life to learn what the difference between DSLR vs XLR is. (But FYI, DSLR is a type of camera and XLR is a type of electrical connector.) In this article, we’ll share our tips and tricks for creating the best environment for your webinar. We’ve also compiled and condensed all of this information into an easy-to-reference one-page infographic – check it out here.
Let’s start with the basics: What software or application are you using to record and what are you going to say?
Zoom is potentially the most popular video conferencing tool on the market today. With its ease of use, it’s no surprise that this is what your CEO and your grandmother are comfortable using. It’s also great because you can record your live presentations, and look for areas to improve for next time or repurpose the video for your content library.
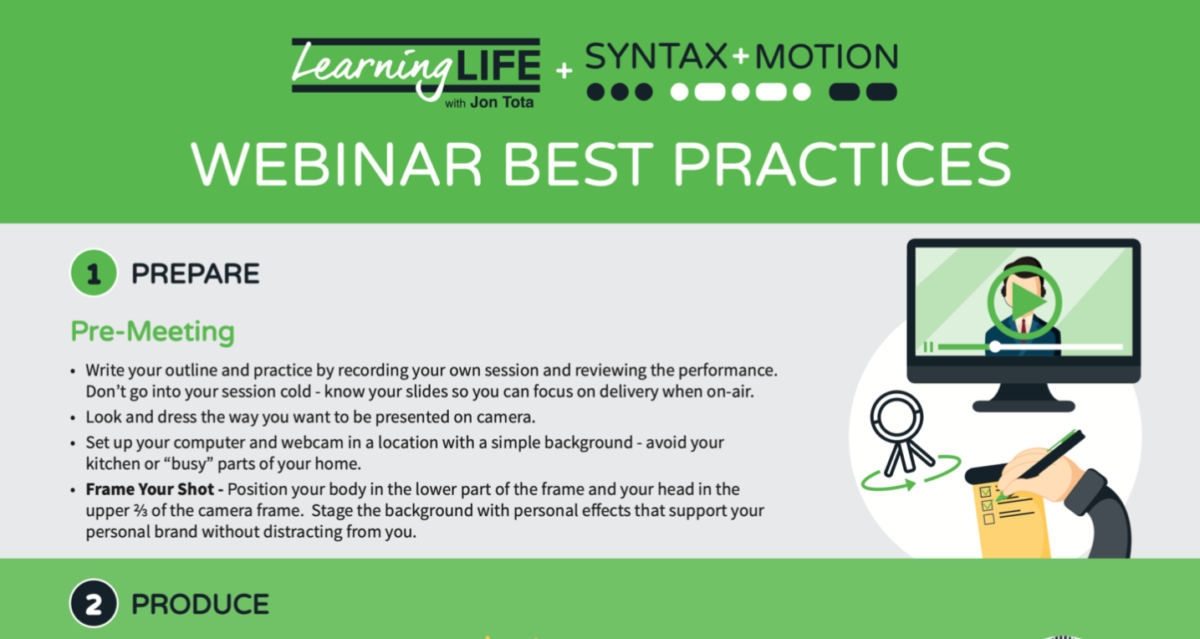
Don’t go in cold! Set yourself up for success. We know you know your stuff, so let that shine through to your audience. Outline your presentation ahead of time and know your slides so you can focus on delivery when on-air.
In addition to practicing what you’re going to say, take a few practice recordings and play your session back. Look for things that you can improve on in your presentation, changes you’d like to make in your background, and most importantly that your microphone works and sounds clear.
I’m going to mention practice often in this article – it’s important to put the time in. I have been in many webinars or virtual conferences where speakers did not test their set up before coming on air for their talk and their microphones or presentation sharing did not work as expected.
Now onto the fun stuff.
Frame your shot. You want to be in the center of the camera. Position your body in the lower part of the frame with your head in the upper ⅔ of the camera frame.
While the cameras built into our computers and phones can be great at capturing high quality video, they are not always in a good position to make us look our best. To avoid the ‘up the nose’ look, place a stack of books or a box under your computer to bring the camera to eye level or above.
If you’re using Zoom to record or deliver a presentation, try out the “Touch Up My Appearance” setting and let the computer make you prettier! (Preferences> Video> My Video> Touch Up My Appearance). You can also “Enable HD” video recording in the settings/preferences for higher quality video. (Preferences> Video> My Video> Enable HD).
Stage your background. Choose a few objects that support your personal brand without distracting your audience. Plants, photos or art pieces, statuettes or trinks, and don’t forget to highlight your accomplishments with books or awards.
Your outfit. Solid colors or distinguished patterns on clothing work best for video. Avoid checkered clothing as it can be hard on the eyes and distracting to viewers.
Plan ahead. If you are pre-recording and plan on editing segments together, you want them to look like they were all shot on the same day/time– your outfit and background need to match. This means after you press record for the first time, you should avoid adjusting your background and changing your outfit. If you want to wear a sweater during your presentation, ensure that the sweater and temperature of the room you are in is compatible with your nervous sweats!
Similarly, your hairstyle should not change either. It may not seem like much when you’re looking at these videos individually, but once cut together, the slight changes will be noticeable.
Lighting
Lighting can be tricky for anyone. We want to achieve ‘flat lighting’ and to light your face as evenly as possible.
Light sources. Find two light sources, one in front of you and to the left and the other to the right. If you have overhead lights, use them as fill lights. If you have dimmers, use them! They’re great for fine tuning light sources as needed.
Avoid being backlit by light sources behind you at all costs. Your beautiful window view does not help your face show up on camera, it will blow out the exposure and make you appear dim and hard to see. Natural light can be nice, however it changes as the day progresses, so we recommend closing the curtains and using artificial lights for ultimate control and consistency.
Glasses! Lighting people with glasses can be very challenging. The glare of the lights and your computer can be distracting to viewers, not to mention to you. Plus those pesky frames can put shadows on your face. We recommend using contacts if you have them.
If possible, these lighting sources should be slightly higher than your head and angled down toward you. Move your lighting sources up higher so they are pointing down at you. Then continue to move them further away from you until there is no glare left in your glasses but you are still well lit.
Glasses with thicker frames require a larger soft light source to avoid casting shadows from the frames. Don’t have a large soft light? No problem – you can diffuse a harsher light with household items like parchment or wax paper, frosted shower curtain liners, t-shirts, sheets, garbage bags, or even printer paper! Just be sure to keep all flammable materials away from any lighting source that gets hot.
If you’ve done all of the things we just mentioned but you’re still seeing a glare in your glasses, try turning down the brightness on your computer.
See it in action: Caleb Pike with DSLR Video Shooter (6:38) did a great video on lighting people with glasses.
Now that you’re looking your best, let’s get you sounding great.
Tip 1: Microphones
There are many levels to consider from when thinking about audio.
As audio professionals, we use external, wired microphones to capture the clearest audio. These types of microphones should ideally come from above and be pointed toward your mouth. But because of the quality of the microphone, it’s ok if you’re not able to position the mic above you – it will still capture great audio. If this is something you will be doing frequently, it may be worth it to invest in an affordable standalone microphone like the Blue Yeti ($129.99) or Fifine’s Metal Condenser Recording Mic ($39.99). There are many other decent quality mics under $100.
If at-home webinars are not something you will be doing consistently or you’re just not ready to commit, you can use wired or Bluetooth headphones. Apple Airpods or Beats Powerbeats Pro wireless headphones work wonderfully for this purpose and are not very noticeable. Syntax + Motion CEO Jon Tota swears by his AirPods for virtual meetings and presentations. For other wireless earbud options, check out this article by the Sound Guys on the “Best true wireless earbuds”. They have gone above and beyond with this article and included demos of the microphones for each pair they write about.
If wireless headphones aren’t in the cards for your, regular wired headphones with a microphone is a decent substitute. Finally, the microphone built into your computer is a decent alternative should you have nothing else to work with.
No matter what type of microphone you are planning to use, practice is the key to success. Before you purchase a new device, try out the ones you have and compare them. It is possible that your built-in computer microphone will suffice.
Tip 2: Location
Nowadays, we’ve gotten used to seeing or hearing pets and kids in the background of virtual meetings. But this is not something we want during a webinar.
Choose a physical location with minimal background noise. Avoid running the dishwasher, washer/dryer, air conditioners, or fans while recording or presenting. Turn off notifications on your phone, mute your Slack notifications and close all unneeded desktop programs to avoid unnecessary distractions and noises.
If your room has a significant echo, consider adding some large, soft objects. Rugs, blankets, and curtains can add to the style of your room and will work well for absorbing noise. Check out these articles from Modern Castle and Soundproof Panda on the cheapest ways to soundproof a room using decor and furniture.
Practice! Try out the microphones that you have available before purchasing anything! Your computer or current headphones may work well enough that you don’t need to purchase another device. If you’re going the wireless earbud route, we recommend wearing a single earbud while you are presenting. Try it and see if it works for you.
Now, take a test recording – play it back on your computer’s speakers, and then in your headphones. How does it sound?
They say content is queen (or king or non-gender-specific-ruler), and finding more than one use for something you create can be valuable for both you and for your audience. Audio and video are some of the most easily repurposable formats to create more content.
Post Production & Editing
Use a built-in program like iMovie or Windows Movie Maker to do small edits like cutting out pauses or introductions during your webinar. You can also use these to split your video up into smaller, more bite-sized clips to tease your talks on social media, your website, or YouTube.
YouTube tutorials are a great way to learn more about editing programs and best practices. TechTeacherNate (8:39) has a great YouTube tutorial for the basics of iMovie.
Naturalvita Tutorials (16:30) has a great YouTube tutorial for the basics of Windows Movie Maker.
You did the work, make sure you get the credit for it. Watermark your content so you always get credit no matter how your recording is used! DBS Techies (1:40) have a great YouTube tutorial for iMovie users. Although Windows Movie Maker does not explicitly allow for watermarks (or multiple video tracks), The Meejah Channel (5:16) provides a great work around.
We’ve covered a lot in this article, but now you are ready to start producing fantastic video content from your makeshift home office. To make it even easier for you to reference this information, we’ve packed it all into a nice one-page document (download here). The hundreds of Zoom meetings, virtual team meetings, and happy hours may say otherwise, but I hope this article proved to you that it is possible to record and present great video content at home.